
Chapter 4: Formatting & Edit Controls
Contents
4.1 Sample File: \Samples\04_format\format.asp
The code sample
provides grid interfaces to two tables, Departments and Employees, at the same time. In this sample, we take advantage of various data formatting techniques and edit controls that AspGrid offers.
For the sake of brevity, we only show the second (more complex) half of the code sample:
... Grid1 code omitted for brevity
' Create instance 2 of AspGrid for the Employees table
Set Grid2 = Server.CreateObject("Persits.Grid")
' Assign unique ID to prevent collision with other grid
Grid2.NumberOnPage = 2
' Pass external connection object to grid
Grid2.Connection = Conn
' Specify SQL statement
Grid2.SQL = "select id, dept_id, name, salary, _
hiredate, maritalstatus, fullyvested from employees"
' Enable Left-side buttons
Grid2.ShowLeftSideButtons
' Specify Table Caption
Grid2.Table.Caption = "Employees"
Grid2.Table.Caption.Font.Face = "Arial"
Grid2.Table.Caption.Font.Bold = True
' Hide identity column
Grid2("id").Hidden = True
' Specify location of button images
Grid2.ImagePath = "../images/"
' Set <TABLE> attributes
Grid2.Table.CellSpacing = 0
Grid2.Table.CellPadding = 1
' Set column caption for dept_id
Grid2("dept_id").Caption = "Department"
' Attach a lookup table to dept_id column
Grid2("dept_id").AttachForeignTable _
"select id, name from departments", 1, 2
' Set column caption for name
Grid2("name").Caption = "Full Name"
' Set column caption for salary
Grid2("salary").Caption = "Salary"
' Format the numeric content of salary column
Grid2("salary").FormatNumeric 2, True, True, True, "$"
' Align to the right
Grid2("salary").Cell.Align = "RIGHT"
' Set column caption for hiredate
Grid2("hiredate").Caption = "Hire Date"
' Format date value
Grid2("hiredate").FormatDate "%b %d, %Y"
' Mon DD, YYYY
' Specify default value
Grid2("hiredate").DefaultValue = Date()
' Set column caption for marital status
Grid2("maritalstatus").Caption = "Marital Sts"
' Specify a list of options
Grid2("maritalstatus").Array = Array("Single", "Married", "Divorced")
Grid2("maritalstatus").VArray = Array(3, 2, 1)
' DB values
' Set column caption for fullyvested
Grid2("fullyvested").Caption = "Vested"
' Display this field as a check box in edit mode
Grid2("fullyvested").AttachCheckbox "Yes", "No"
' Enable sorting
Grid2.ColRange(2, 7).CanSort = True
' Set colors, fonts and sizes
Grid2.ColRange(2, 7).Header.BGColor = "#B0B0FF"
Grid2.ColRange(2, 7).Header.Font.Face = "Arial Narrow"
Grid2.ColRange(2, 7).Cell.Font.Face = "Arial Narrow"
Grid2.ColRange(2, 7).InputSize = 10
Grid2(0).Header.BGColor = "#B0B0FF"
Grid2(999).Header.BGColor = "#B0B0FF"
' Display grid
Grid2.Display
%>
4.2 Code Analysis
Let's analyze the code above line by live. The line
creates an instance of AspGrid. The next line
assigns this object instance a unique numeric ID of 2. Setting this property is necessary if several instances of AspGrid are hosted on the same ASP page. The NumberOnPage property is 1 by default.
The next line passes an external connection object to Grid2. The same connection object was also passed to Grid1, so both instances of AspGrid share the same database connection:
The following lines specifies a SQL statement this grid will be based on. Note that the identity column ("id") is specified first in the SELECT statement, which is a requirement for editable grids.
hiredate, maritalstatus, fullyvested from employees"
The following line enables the control buttons (Edit/Delete in the regular mode and Save/Cancel in the edit mode) on the left side of the grid, while preserving them on the right-side. To show the control buttons on the left side only, pass False as an argument to the ShowLeftSideButtons method.
The next three lines specify the text and font for the <CAPTION> tag of our grid. The CAPTION tag immediately follows the TABLE tag and is displayed by a browser as a grid title.
Grid2.Table.Caption.Font.Face = "Arial"
Grid2.Table.Caption.Font.Bold = True
The following line makes the identity column invisible. Failure to hide this column or make it read-only may result in an error when trying to add a new record.
The following line specifies the location of control button images. You don't need to specify this property if all images are located in the same directory as the current page.
The following two lines specify the CELLSPACING and CELLPADDING attributes of the <TABLE> tag:
Grid2.Table.CellPadding = 1
The following line specifies a caption (title) for the "dept_id" column. If the caption for a column is not specified explicitly, the table field name will be used by default.
The next line turns the dept_id field into a drop-down list box populated from the specified SELECT statement:
"select id, name from departments", 1, 2
The dept_id field of the Employees table is a foreign key referencing the id field of the Departments table (its primary key). This represents a one-to-many relationship between the two entities: each department has many employees, but each employee is assigned to exactly one department. The AttachForeignTable method accepts three parameters: a SQL SELECT statement that generates a "foreign" recordset, the index of the field in that recordset that serves as the foreign key (in our case, it is "id" or field 1), and the index of the field that contains a readable value that will be presented to the user (in our case it is "name", or field 2).
The next two lines set captions for the "name" and "salary" columns, and we do not show them here. The following line sets numeric formatting for the Salary column:
The first argument of the FormatNumeric method specifies how many decimal digits to display. The other arguments are optional. The second Boolean argument specifies whether to display comma separators. The third Boolean argument decides whether to use a negative sign or parentheses (...) for negative numbers. The fourth Boolean argument controls whether to use the US format (floating points and comma separators) European format (floating commas and dot separators). And the last string argument specifies an optional prefix (in our case, a $ sign).
The following line aligns the contents of the Salary column to the right by adding the ALIGN="RIGHT" attribute to every <TD> tag in that column:
The next line specifies a format for the HireDate column:
The FormatDate method accepts a formatting string which consists of one or more codes. The codes shown above convert a date into the format "Mon DD, YYYY". Click here for a complete list of codes. The FormatDate also accepts a second optional argument which formats a date in the edit mode (as opposed to the regular display mode). If the second argument is omitted, AspGrid will use a default date format when in the regular display mode.
The following line specifies a default value for the hiredate column:
We chose to set the default value for this column to today's date, but we could use any other date expression. A default value can also be set for hidden columns. This type of usage will be demonstrated in a later chapter.
The "maritalstatus" field of the Employees table stores an integer code for an employee's marital status as follows: 1 for divorced, 2 for married and 3 for single (codes are assigned in alphabetical order). To present this column to the user as a drop-down list of options, the following code is used:
Grid2("maritalstatus").VArray = Array(3, 2, 1)
Here we supply an array of options (via the Array property) and their respective values (via the VArray property). Note that this code has much the same effect as the AttachForeignTable method. The difference is that the values are coming from pre-set arrays rather than recordsets.
The following line turns the Boolean field "fullyvested" into a checkbox when in the edit mode. A non-zero value will be displayed as a checked box, a zero value as a clear box. The two arguments to the AttachCheckbox method specify what must be shown in the regular display mode if the field value is non-zero and zero, respectively. In our case, the arguments are simply the strings "Yes" and "No", but they can also be HTML tags such as "<IMG SRC=yes.gif>" and "<IMG SRC=no.gif>".
The next line enables sorting for all visible columns. Recall that column 1 ("id") was made hidden earlier in the code.
The rest of the code is simply color, font and size formatting and we will not show it here.
4.3 Pop-up Calendars
AspGrid 3.1+ provides support for a JavaScript-based pop-up calendar via the method AttachCalendar. When this method is called on a column displaying a date, a "calendar" icon will be displayed next to the edit box allowing a user to pick a date from a pop-up calendar window:
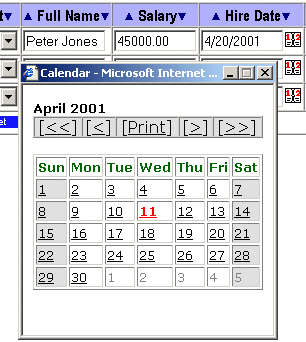
AspGrid is shipped with Date Picker, a freeware JavaScript-based calendar developed by Kedar R. Bhave (softricks@hotmail.com). The javascript source code for Date Picker is placed in the file calendar.js and it can be found under the directory \Samples\04_format of the installation. The use of the pop-up calendar is demonstrated by the code sample http://localhost/aspgrid/04_format/format_calendar.asp.
To use the calendar feature in your application, follow these steps:
1. Place the file calendar.js in the same directory as your ASP pages.
2. Include the following in your page header:
<script language="JavaScript" src="calendar.js"></script>
...
</HEAD>
3. In your ASP script, attach the calendar to a date field as follows:
The Month, Year and Format arguments are optional. If Month and/or Year arguments are omitted, the current month/year calendar will be displayed. By default, the calendar generates dates in the format MM/DD/YYYY which can be changed by specifying a different Format, for example, "DD/MM/YY".

